The Things You Don't Necessarily See
(aka The Anatomy of a Picture)
by Walter Graff
|
| |
 |
| |
Often when you watch a film or TV program, you often don't see the subtleness of lighting. By subtleness, I mean the use of fixtures and color to create near subliminal effects and looks that when put together as the final picture, make for a pleasing final shot. I thought I'd dissect one shot to show you how the elements of lighting all put together make the pleasing picture you see. Look at this article as sort of a CSI:Lighting (a take off on a forensic American detective TV program).
The photos in this article are taken from raw footage of a Pay Per View program I shoot called "Caught On Demand" produced by Rich Zlotowitz. Check it out on your cable system. |
| |
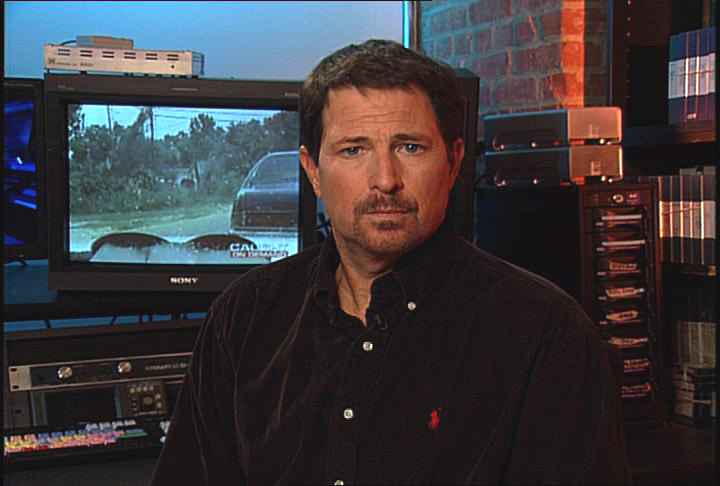
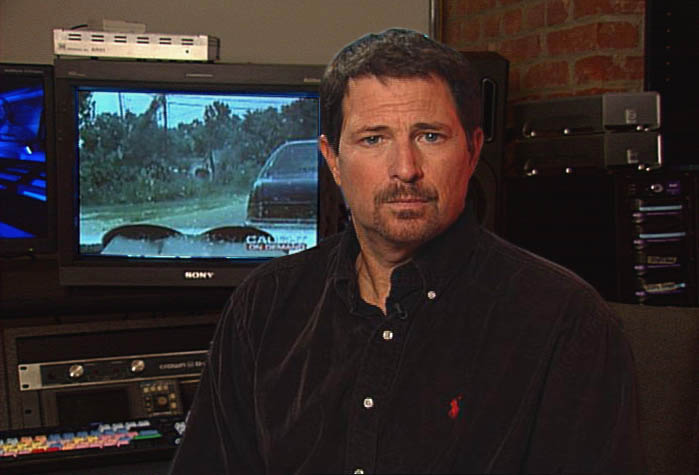
| To understand the anatomy of a picture, first we must first see the final product. Below is a still of the host in the setting we shoot the wraparounds in. |
| |
|
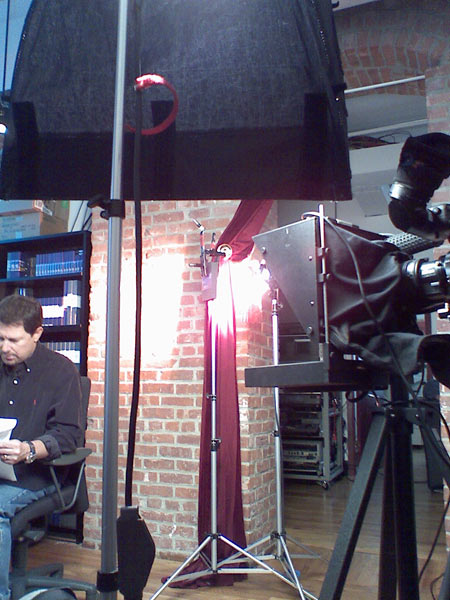
The host (Court TV's Michael Bryant) in his environment for the taping |
| |
| Let me discuss what we are looking at in the shot above and what I consider when Lighting such a scenario. The host is normally taped in this editing room environment. During the taping, footage plays in the TV monitor over his shoulder. There isn't much we can play with in terms of props/etc in the room as it is a real edit room, so what we have, is what we have to work with. |
| |
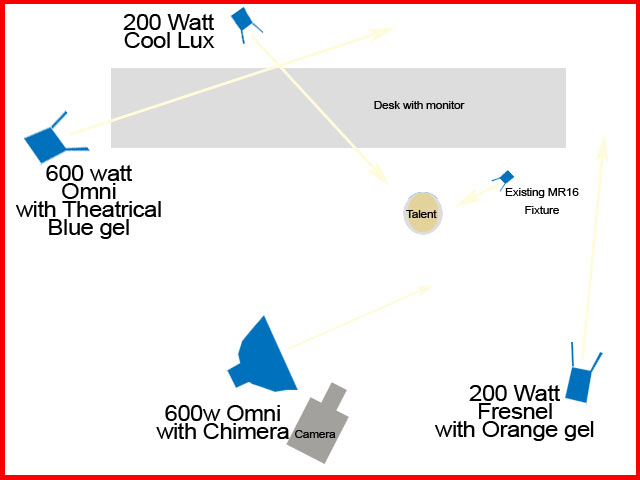
| Let me go over the lighting plot and the considerations as to why I use what in the set-up. First of this set up uses five fixtures in total to light the room. with three of those for the talent and two to illuminate portions of the room. Below is the plot: |
| |
|
| |
| Let me go over each fixture and what it does. I'll use photos to help, but apologize for the quality in some as they are taken with my cell phone. |
| |
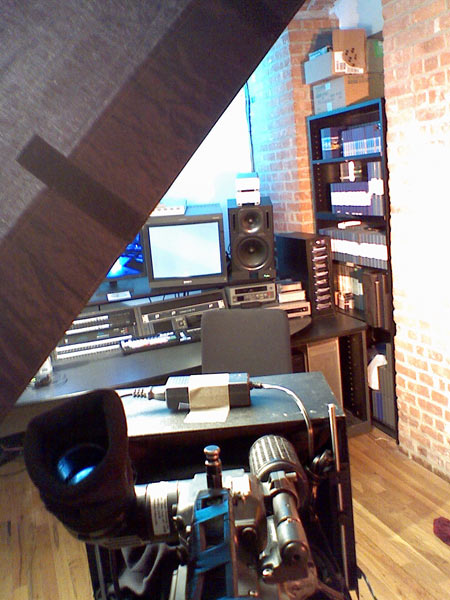
| First let's start with the talent. As I said earlier, I am using three fixtures to light him. The first is a Lowell Omni 60 watt fixture with a Medium Chimera box attached to it. This is his key. Notice in the plot how much the light is not faced directly at him. That is mainly because I don't want too much spill on the back wall. I could have used a flag too, but the room is very small and there simply isn't enough room. In actuality, this fixture doesn't really point at my talent but somewhere between him and the camera. I have three photos that illustrate this. |
| |
|
| First to give you a reference, above is a shot looking over the camera/teleprompter at the talent's chair. Notice the light fixture immediately left of camera. Also notice it is not aimed directly at the chair in the distance but across the front of the camera. As I said, this is to allow it to light my talent but keeps some of the unwanted spill of the spill off the wall. I used to have an egg crate attachment that also helped but broke it so only have the fixture as is. |
| |
|
| Above is a second photo to illustrate how the key is aimed more across the top of the camera than at the talent. It still does what it needs to do to light the chair but doesn't blatantly light the wall behind him. I don't want it to, because I want to put a bit of color on the wall, and too much light washes it out. You also get an idea of how small the work space is. Using a flag to help me out is doable, but difficult do to the limited space so I opt simply to turn the key away from the talent. |
| |
|
| Above is a third angle looking from behind the fixture. Notice the talent gets enough light. The rest of the spill form this light heads mostly in the direction of that brick wall and the portal in the distance. That is okay. I am not shooting over in that area so the spill doesn't bother me. |
| |
| If you look at the lighting plot shown earlier, you'll notice the other two fixtures that act as backlights/kickers on my talent. One is a light I placed there and one is simply a fixture that already exists in the room that I use. |
| |
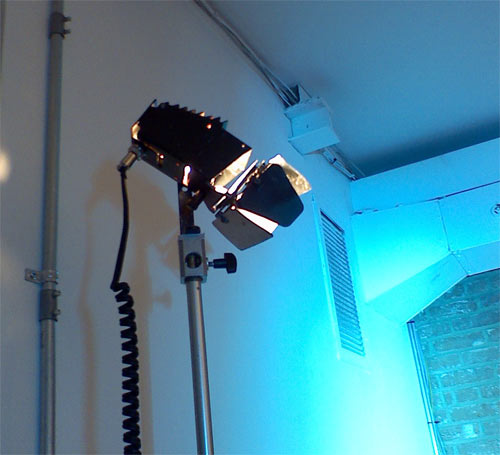
| The fixture I use is a 200 watt cool lux. I place it behind the desk so that it rakes light across the right side of my talent. Notice it's location in the light plot above is in the upper left-hand side of the illustration. |
| |
|
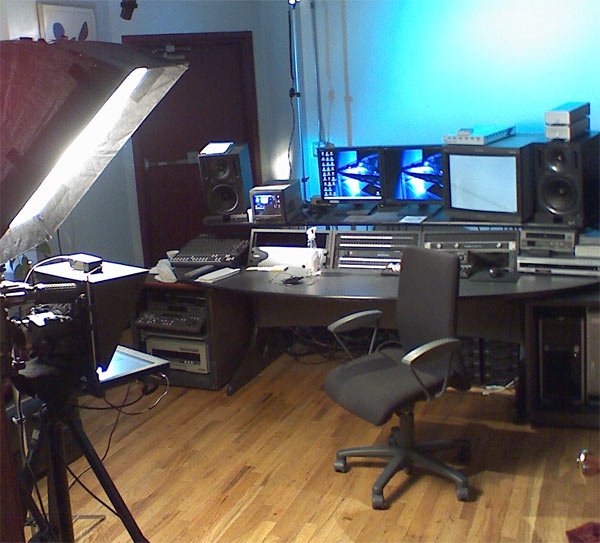
| Above is a shot of the fixture in action. It is a Cool Lux 200 which is a MR16 fixture and great for tight spaces. It's also slightly blue in color due to a piece of color gel I use. The motivation for this fixture is to subliminally represent the TV monitor over his right shoulder. In other words, if you look at the shot of the talent below (identical to the original version above), I am using this fixture to represent the glow of the monitor and what it might do as a source of light to the right side of his body. It's subtle and may not be represented well in the still here, but it basically outlines the right side of his body and gives a slight glow to the top-right side of his hair as if the TV is creating the light and reflecting off of his body. |
| |
|
| |
| I use one more fixture to light the talent's back/side. In this case, luckily the room has permanent MR16 track lighting installed as it saves me setting up another fixture/light stand in what is a small room. If you notice his left shoulder/arm (right side of photo) has a slight outline to separate his black shirt from the background. Very simply I turn one of the MR16 track lights down onto this area to offer this separation. If I didn't put light here, his left side would blend in and get lost to the black hard drive case/desk. It's very subtle, and doesn't register in normal viewing and represents one of those light you don't really know I used to light him. |
| |
|
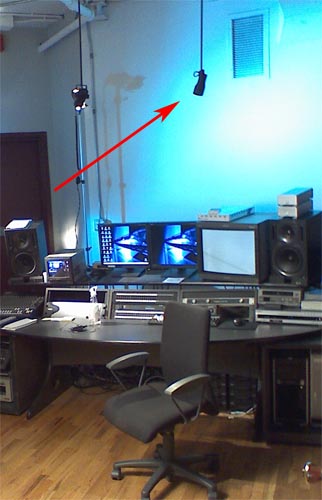
The arrow above points to the existing room fixture that I use to give his left should a bit of punch. In a tight situation such as this having an easier option is great. Also notice the light on the silver stand on the left side of photo, behind the desk, that acts as the motivation kicker for the monitor as described earlier. |
| |
| Just a note: You may hear me use the term backlight, kicker, side-light, etc. All are different terms for basically the same type of light, a light that comes from somewhere other than the front of the person. a kicker is more of a side light that lights more of a persons outline on one side while a backlight could be said to be more directly (but no necessarily) behind a person. And a side light is a more exaggerated kicker that comes more in the plane of 90 degrees to a person's side. |
| |
| And finally, I used two lights to light the room. These lights are more subtle and simply to enhance the room for television. Often I use lights that you don't really notice as lights, and in this case, I have motivation that calls for these lights. |
| |
| First let's take another look at the main shot. |
| |
|
| |
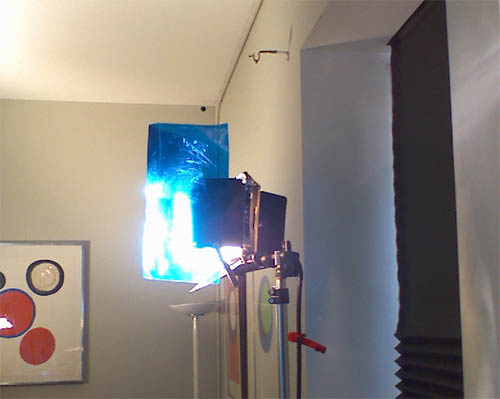
| I always look at a TV monitor as giving a blue glow since the light from it is in the range of 6500 kelvin. In that case, what better way to enhance a TV set than to add blue light around it. Also blue light has a general appeal as a color tone in a professional edit room. Notice the glow of blue light above the monitor . I accomplish it with a 600 watt Lowell Omni light and a theatrical blue gel. |
| |
|
The Lowell Omni light and Steel Blue gel I used |
| |
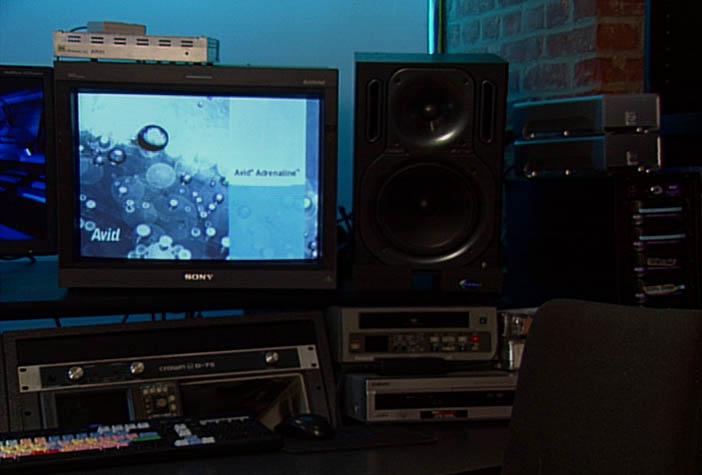 \ \
Above shows the blue lights effect isolated. Notice how the blue light enhances the monitor.
|
| |
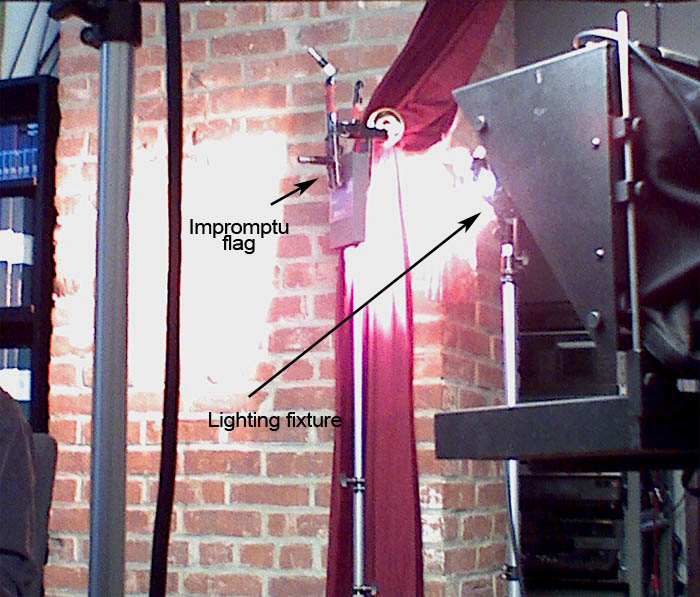
| The final fixture in this set-up has a similar effect as the blue light did for the monitor; it enhances the red brick wall. For this , I used a 200 watt Lowell Pro light. I took three sheets of Lee Full CTO and used that to create a warm light which I aimed at the brick wall allowing the light to spill onto the desk a bit. While you may notice it here because I showed it to you, if I hadn't, you probably would have never really noticed the light's effect, and just thought of a brick wall. I also used a quick made flag to help make sure the light didn't spill too much onto the talent as closing the barn doors down on the fixture was not enough with all the orange gel. |
| |
|
| I'm sorry I don't have a better photo of the fixture in action. Basically I aimed it at the brink wall and gelled it orange. Because it spills so much I took a tape box and clamped it to a stand and placed that between the fixture and the talent to keep the spill from reaching him. |
| |
Above is what the orange light by itself does. Notice it not only hits the wall but also spills a bit on the desk and equipment which makes for a nice color contrast to the blue of the monitor and the blue light I used (now turned off in this photo). But notice the silhouette of the talent's chair in the lower right side of photo is not affected by the orange light due to the use of the impromptu flag.
|
| |
| As you can hopefully understand from my writing, simply lighting the talent would have been acceptable but adding additional enhancements motivated by elements of the room makes for a much more aesthetically appealing finished product. Had I just lit the talent and not considered the room you would end up with the photo immediately below. It's not wrong, just not as exciting as adding elements to enhance the room. |
Above is the room as seen by the camera with just the three talent lights. There is nothing wrong with it by itself, but as you may agree, the photo on the right below adds life to the shot.
|
| |
|
|
I didn't have a shot of him without the additional background lights so 'PhotoShopped' him into the picture on the left if you noticed the difference around the edges.
| |
|
| |
| One other note of interest. Some of you may have noticed that some of the orange light still spills a bit from the reflection of the wall onto the lower right side of the talent's face. That does not bother me as it is the shadow side of his face and while it might look a bit more pronounced because you are looking at a still and I am pointing it out, in the context of the video, it does not register as much and looks more like color in the shadow than light. |
Copyright 2013 by Walter Graff. This article may be circulated and shared as long as the following reference is made: 'This article appears courtesy of Walter Graff- http://www.waltergraff.com'
Please don't hesitate to send me an e-mail if you have any questions or comments please e-mail me at Walter@waltergraff.com
|
| |