Flags, and Nets and Patterns...Oh My!
by Walter Graff
Time and again you see me trying to get the most with the least. But sometimes I'm forced to use a little more than normal. When a room is only 15x 30 and cluttered with tables and boxes I can't remove, plus I've got to get my talent, his entourage of five, camera audio person, lights and prompter in that space, I'm faced with a bigger challenge; how to get the most with a room that is going to make things difficult? More importantly, does the size of the room affect how I want to light the scene?
In this case I’m in a room that is longer than wider, but I can’t use the long way (which I prefer) because there are too many desks and chairs and I need a clean background. So I shoot from the narrow side rather than the longer side. (See diagram below). What I liked about the room was that it had cloth material on the walls that was good not only for sound but for background as it creates a bit more softer texture with light than does a painted wall.
We are using a teleprompter in this scenario and that means little to me other than the fact that the glass on a prompter cuts down my light to the lens by about a half stop. In the end that may mean a bit more light on my talent. That's not a problem when I have plenty of room between the talent and the lighting instruments but this room is tight so I'll have to light him with a bit more while not making him feel like he is under the inquisition. While there are about 20 different ways to light this scenario (due to the room limitations) I am going to be forced to place lighting objects rather tightly in the room. While that sounds like trouble, it will not affect my overall goal; a nice soft look. I will get the look I want and use the instruments I want to use to light him.
As I often do, I am using one of my foam core cut-outs to start with to create the pattern on the back wall. This foam-core cut-out is the kind that has a cukaloris type of random pattern which I cut in it some time ago and keep in my kit. It ’s such a great pattern because I can make hard shapes, soft shapes, trees, blinds, slashes and nearly anything with this one piece of material. You've seen me use it successfully countless times in other articles. Best of all, when it finally wears to the point of being ripped and useless, I can simply throw it out and make a new one. I’m going to use it this time to make a simple, soft pattern on the wall behind the talent. The cloth material that exists on the wall is a bluish gray so I’m going not going to fight it with color, rather I'll compliment it with additional blue light.
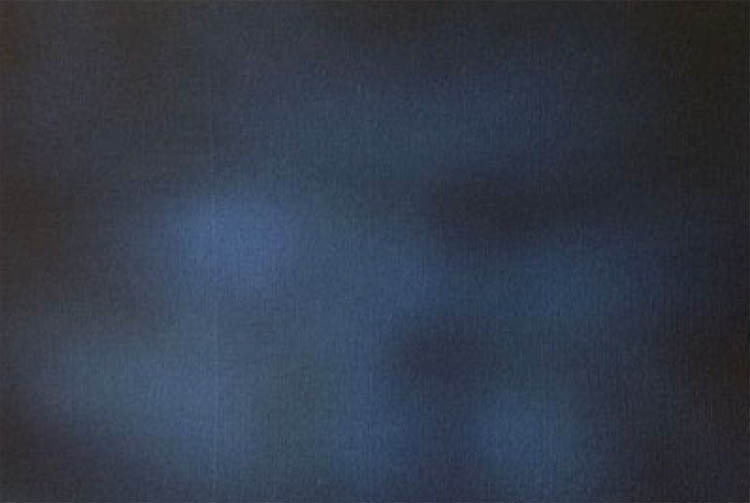
Photo#1: This is looking through the lens at what will be my
background. It ’s a pleasing, non-structured mass of light and will
make for a nice soft background. Photos later on show behind the
scenes of this set-up.
As the lighting plot below shows, there are lots of things in the room that I can’t get out of the way.
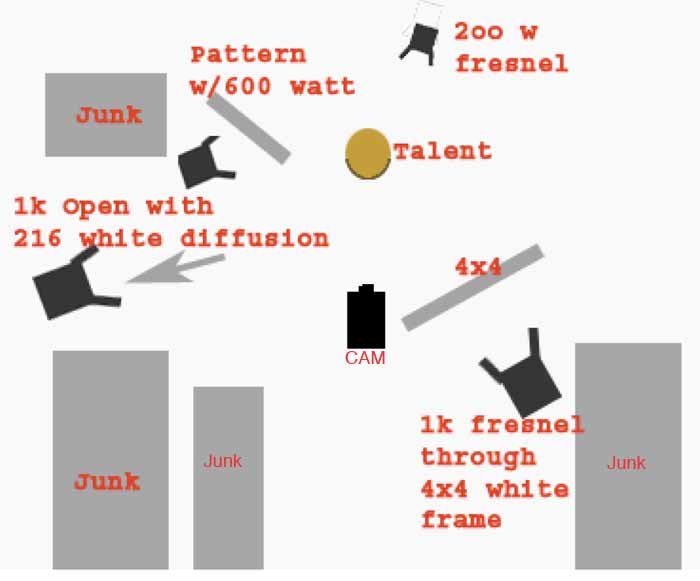
I decide to start with a 1k key aimed through a 4x4 frame that has translucent material on it. I place it just to the right of camera (see above where labeled "1k through frame"). Problem with the room is the back wall above is not too far from camera and a large frame of light makes a nice soft light but will cause too much of it to spill on the background. So why would I put a 1k through a frame so as to have to deal with lots of light spill? Because a large source of light is always the nicest looking light. As for the light that will end-up places I don't want it to be, I can always control light in any set-up so I am not worried. In this case I make a foam core flag that looks like an upside down “L”. It is that shape because it will allow light to hit the talent while still being able to cut the spill off the background. See photo below:
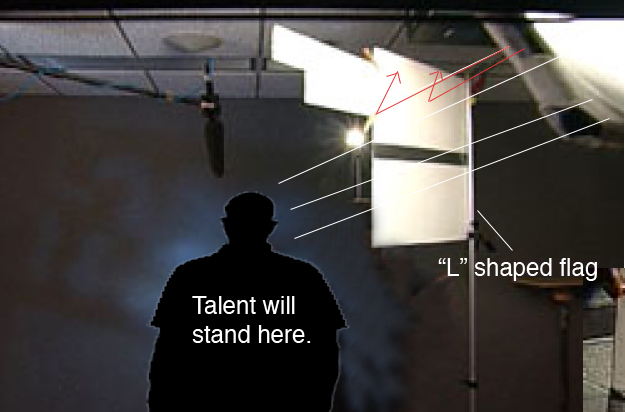
This is a view from the camera lens at where my talent will be standing, Notice edge of 4x4 frame in upper right. I added the white and red lines here to illustrate how the flag will cut light from striking the wall (red lines) while allowing the talent to be lit (white lines). You can see how the blue area remains relatively dark as a result.
And in the photo below is a view from near where the talent is going to stand (I added shadow of a man) looking back at the camera lens.
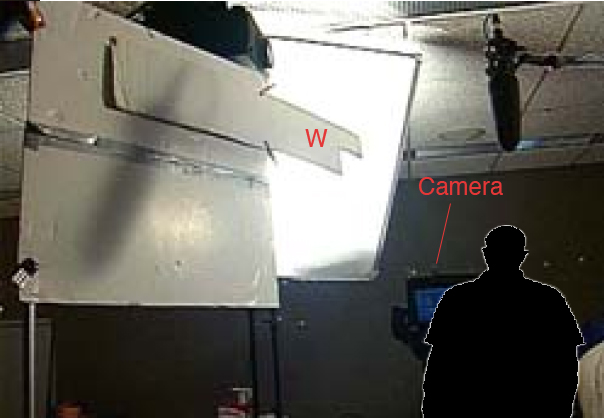
If you compare the flag in the previous shot to this you may wonder why the narrow piece of flag that sticks out (labeled with a "w" isn't wider. It is wide enough to take the light off exactly the spot I need it to on the wall so there was no need to use a larger piece.
A big soft source also helps me for another reason, shadows. Bigger soft sources make for softer shadows behind a talent where light does leak so it actually helps me to use a bigger source than imply using a key-light with a piece of 216 diffusion clipped to the barn doors. For a fill-light, I would place a smaller fixture on the left side of the camera to match the right, but can’t. Tables are everywhere in that corner (labeled "junk" and "table" in the light plot. So I will put the fill-light from a more extreme angle as shown in the lighting plot above. In fact I end up placing it almost 60 degrees off center which some might consider to sharp an angle for a traditional 3-point set-up. But that is ok. I’m using a 1k open face with 216. It makes for a different quality of light and gives the face some subtly different feel, in other words, not perfectly even. I don’t like even. And since it is being placed rather far away compared to the key, I can use a 1k with no problem.

Here is a view of the 1k (fill-light) with diffusion (upper right of photo). I also added an image of where the talent will stand. If the angle of the key (left) and the 1k don't seem extreme, see the light plot again for better idea of angles. You'll see that the fill light is nearly coming from the side of the talent. But that is okay as it does enough to fill in the talent without creating problems. Also notice the 600 watt light with blue gel and the cut-out which are aimed at the wall behind the talent.
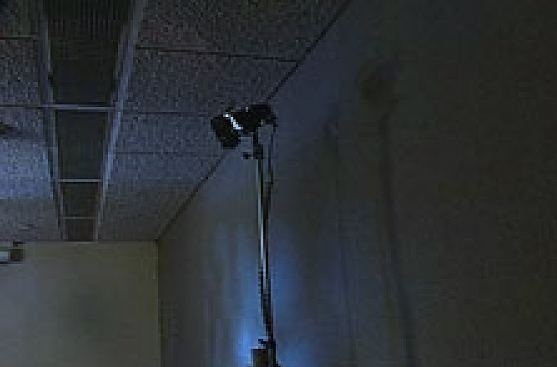
And finally, for a back light I’m using a 150
watt Cool Lux MR16 fixture. I never like my
back lights absolutely from dead center and
this is no exception. I place it slightly off his
right shoulder and create a bit of hair light that is warm to highlight his brown hair.
When one puts it all together, I’ve used four lights to make what I think works for a nice even, yet stylized shot. No It ’s not magic, but not every shot has to be. It does the trick, and that’s what matters.

Copyright 2013 by Walter Graff. This article may be circulated and shared as long as the following reference is made: 'This article appears courtesy of Walter Graff- http://www.waltergraff.com'
Please don't hesitate to send me an e-mail if you have any questions or comments please e-mail me at Walter@waltergraff.com