EXTERIOR BLUE/GREEN SCREEN WORK
by Walter Graff
I was recently faced with the task of doing pick-up shots for an infomercial. The shots that needed to be replaced had originally been shot outside, on location. So it only made sense that the shots to replace the originals needed to also be shot on location.
The only problem was they needed to be done quickly as we were anxious to update the program on-air as soon as possible, and the talent was in NY while the location was in Connecticut. So the easiest thing to do was to bring the location to the talent. Sounds backwards, but technology makes it work.
Thanks to the use of blue/green screen this is all easily and frequently done. Let me take a moment to show you what I needed to do it and the considerations I faced. First of all, thoughts about the pick-up shots related to the original program.
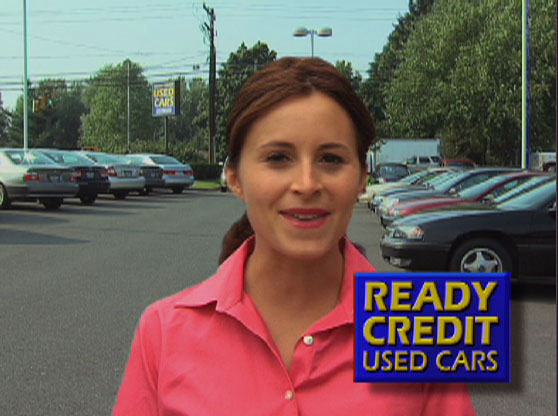
The original shots where done in the parking lot of a car dealership in the spring of this year so these pick-up shots come 6 months later. The trees were in full bloom and the day was a mix of sun and mostly clouds when I originally shot the program and since this was still summer, visually it works. I used nothing but natural light and the sun in relationship to the talent for the original shots so would follow suit here. The original shoot day was partly cloudy and occasionally the sun peaked out from behind the clouds. I mae sure that when it did appear, it was over her shoulder and behind her. To keep the sun as muted and soft as possible when it did appear, I placed a 4 foot by 4 foot translucent frame (Photoflex if you want to look it up on BH photo web site) between her and the sun. This way when the sun did show it's face, it was muted and softened so as not to be sharp.
It was not the most perfect situation, but outdoors rarely is. I had no crew to speak of so it needed to be as simple yet as effective as possible. I only had this day to shoot so was actually lucky I had a mostly cloudy day and made sure I was shooting later in the day so that the sun was not so much a factor. Had the sun been overhead it would have required my diffuser to be over head and that would have taken more time, equipment and manpower so I went for later in the day knowing that the direction my talent stood needed to be a certain way and that meant if anything I wanted the sun out of the picture and behind her. With these things in mind, my pick-up shots needed to have a similar look.
Another thought about the original shoot is that I was doing some 15 individual reads which would be part of the program (I'll link later to the finished product). Those reads were all 'intros' and 'outros' to and from customers stories. All totaled it would take about two hours to do the original reads. During that two hour window each shot would look slightly different depending on the light. Sometimes shady, sometimes more sun, etc. If my audience was comparing shots side by side this might be an issue, but since in the context of the show we see my shots of talent introducing a customer, the customer story, then the talent again closing out the segment, etc, it meant that while different times meant slightly different light, it would not register as a problem or be noticeably different to my audience. And even if it was, it wouldn't matter as they know its outdoors and subconsciously understand that light conditions change, even sometimes during a take as the sun appears, disappears, etc.
The small montage (below) of shots is from the original shoot to show you how when I lay them side by side, you see the discrepancy in light conditions, but in the context of the show it matters little. In fact many programs you watch on location have similar situations, even sometimes where cutting from one characters shot to another shows a considerably different light (look) but in the context of a program you don't notice unless some one points it out as I am doing here.


I'd like to make a small point based on what I just said. This article is a spoiler. It's the equivalent of a magician showing you a trick so in the end you say, "Oh that's easy" or "I wouldn't have believed it anyway". When I give seminars, I may set-up a lighting scenario and tell the group that we will be creating the look of a bedroom at night, or a living room at sunset. Inevitably someone in the group questions whether it really is what I represent it as. What is missing is the most important part of any setup, context. Without a story, your mind is more apt to watch and listen. But when I show you what I am doing, your mind tends to become more critical, looking for mistakes and discrepancies. So in this story I am going to explain to you what I did, then show it to you. And even then, because of the "critical mind" thing, you may walk away and think I didn't do such a great job. Yet had I never told you what I was doing, but simply showed you the program, then after, said "hey did you notice the use of blue screen" odds are good 10 out of 10 of you would say no. That's my point, content drives what you interpret and without it, or when I spoil it for you, your minds bias comes into play more it would in a normal viewing situation. It's one of the reasons why all these web sites showing you what different cameras look like can be misleading because without content, a picture of a stuffed animal only tells you a little part of the whole story. It's the artist that makes the picture, not the cameras. Now back to the program.
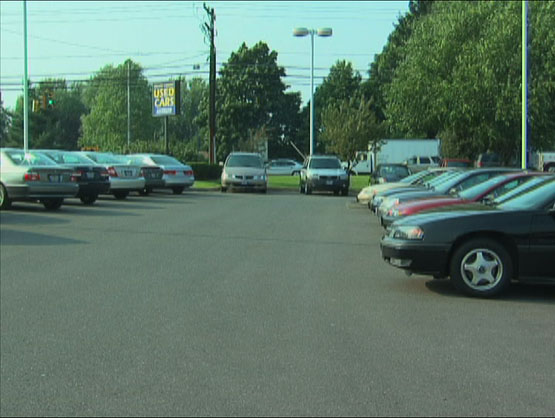
In any one of these situations where I am shooting stand-ups I always record a minute of just the background alone on my tape just in case I ever need it. In this case that would be great because I would have the same background to work from when I shoot my talent over the green/blue screen the second tome around. I went back and looked at the original tape only to discover that while I say I always do it, I didn't in this case. I must have forgot or thought I pressed record and didn't. That means in order to marry the new stand-up shots with the old background I am going to have to re-shoot the background too. Knowing it was a somewhat cloudy day when I originally shot, I waited for a similar day and time of day to get my new shot. I printed out a still from the original program so I could match the frame while on location. That new shot would not have to match the first perfectly as conditions changed slightly during various takes in the original program and once again the audience wouldn't notice.
I knew my new background shot was not going to be exact in frame or even color. Remember my original shot was in spring when trees are freshly green and my new background shot was in late summer when they trees are different in color. Plus the summer sky is hazier in general and spring more crisp. In context, it mattered little. I knew the difference was not enough for anyone to notice.
I waited for a day that in my mind was similar to the original day, estimated where I standing was based on memory, used the photo I printed to help me recreate the shot, and rolled off some footage. Of course the car lot itself was slightly different as the cars were different models and colors the second time around, but again, I don't think it is a factor in the context of the program. I rolled off some new background footage and was off to New York.
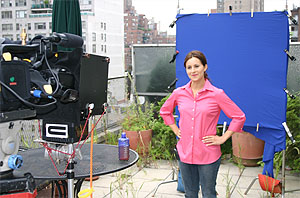
Fast forward to me in NY where my talent lives. Again, I was under pressure to make the changes as soon as possible and it was simply easier for me to shoot the lot one day while up in the Connecticut area (2 hours from NYC), and pick a day that the talent was available in NY. The day we settled on was a similar day in that it was more cloudy than sunny. In fact it was a bit too cloudy (even though the weather reports said something different) but it was okay for my needs. It had t be, I was under a deadline. For the third and final time let me say that I know in context I can afford some discrepancies from scene to scene that make little difference in how my audience perceives the final program.
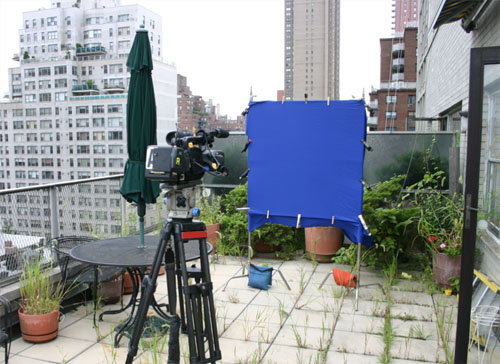
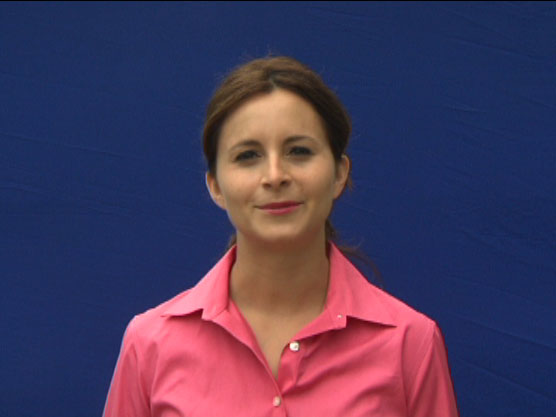
The only consideration I had in doing my pick-up shots what that I wanted to make sure the sun was behind her as it was on the original day. We decided to do this earlier in the day and I faced her west so the strength of the sun was behind her. Why do it outside? Because it would be hard to match the subtlety of exterior light indoors, and because of sound. The sound from the original piece had a subtle white noise from being outside and from the traffic that was far in the background. It just so happens that I have a terrace in NYC and I am located in a quieter part of NYC, yet have the white noise of traffic from First Avenue far enough away as not to be too loud yet loud enough to match the overall background sound from the original shoot. I'm on my way.
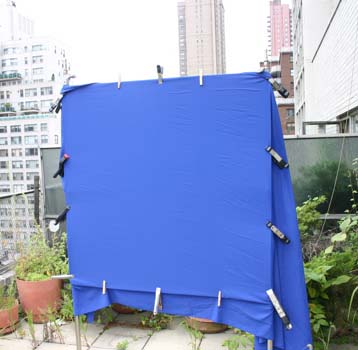
And now for the set-up. Notice I use the term green/blue screen rather than green screen or blue screen. That is because this article is less about one color and more about keying. As you may have read in another article I wrote on shooting keys, the color you choose is based on needs. I always find blue a better color for outside shooting for a few reasons. First, outdoor light is blue in tone overall. Hence the screen is illuminated by 'blueish' light which is great. Secondly, blue is darker than green in tone so in cases where there is a lot of light, blue tends to wash out less. And as you may know from another article I wrote on lighting key screens, its more about color saturation than luminance so blue is a great color to use outdoors. I also have another article on my Instruction page about why one might want to use blue over green in some instances. Check it out.
Next let's look at the actual set-up. I shot the original program on DV format so that will be the format here. Of course some of you are asking why I would do chroma key over green screen on DV when I could do it over more robust formats. If you've read some of my green screen articles or purchased my green screen DVD you would know that most of what people say about how difficult it is to key DV is based on myth and lack of experience, mostly based on illusions and misconceptions about color sampling. This word of mouth myth passed on the web becomes fact. Actually most of it is based on propaganda from certain manufactures trying to push the virtues of their camera over others that they know are just as good, but want to create a competitive advantage over so spread myths that 4:1:1 color sampling can't be keyed and that 4:2:2 is vastly superior. But in the real world DV can and does in most cases key just as well as other formats. I'll show you how later in the article.
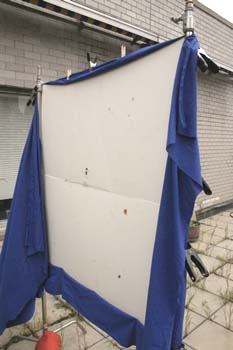
Next I needed to set-up my screen. When shooting cloth screens outside, it's always best to have some rigid backing material behind the fabric to deal with wind and possible consequences. In my case a piece of foam core behind the cloth material that is stretched between two C-stands will be enough to give it the rigidity it needs so as not to flap in the wind.
I should add a note about the best part of shooting outdoors, and that's the light. Nothing lights a screen better and more evenly than natural light, especially hazy light. Many large budget Hollywood blue screen shots are done outside for exactly this reason. This day proved to be my best friend when it came to lighting.
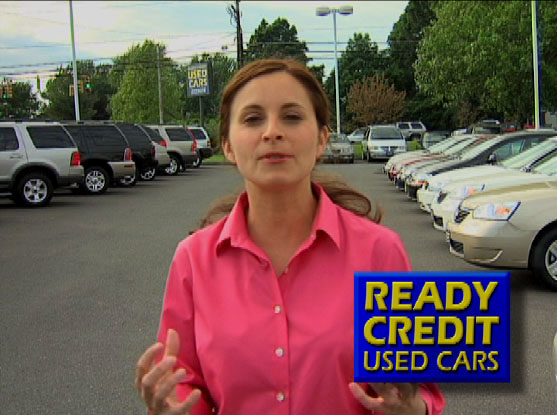
The post production process was easy. I simply had to marry my new shot of the talent with the new shot of the background. But I realize that my use of the word 'easy' comes from my experience. I've been doing chromakeys in film and video since 1982 so I would hope at this point it does come easy. My suggestion is for you to practice. That is the only way you are going to really understand the nuances of shooting chroma key, and just as important, editing chroma key.
For those of you who are Final Cut Pro users, I'll quickly go over what I did in post.
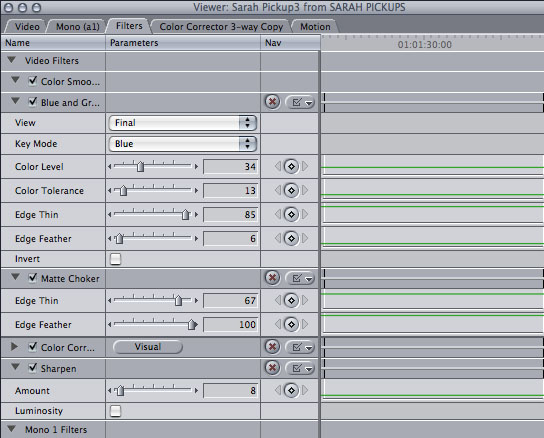
To create the key I am using five filters on my talents video (image of FCP filter shown below).
The first filter I am using is a 4:1:1 color smoother. This filter simply softens the little digital boxes created by digital formats so that the edges of my talent look better. I apply this first before keying.
Second, I'm using the blue and green keyer filter. This filter is easy to use but takes a bit of practice to understand. Something I notice about this filter is that regardless of the shot, it always likes to be set in the same range of settings. It has five controls that allow me to adjust my key so that it cuts properly. I adjusted it until I had a great matte.
Third I'm using a Matte Choker filter. This filter allows me to subtlety soften the edges around my talent so she looks more like she is part of the background plate rather than a sharp image of a person standing in front of it. It softens the edges slightly.
Forth, I'm using a color corrector to adjust the talent to better match my original set-up and to look pleasing. I shot her rather flat in terms of color during this second set-up as shown in an earlier photo so she definitely needed some added color, etc.
And finally, I'm using a sharpen filter. I found that to make her look like the original shot, I needed to apply a very slight sharpening to her. It is lost to the photos here but on a real TV matched very well.
All in all, I was very pleased with the outcome and no one could see the difference without me pointing it out. Of course if I did tell them about it before-hand, as I am doing with you, they could see it if they looked. But this is not about trying to figure out how the magician does his tricks, but rather adding additional reads to an existing program, and finding an easy way to accomplish it quickly. With the way I accomplished this, it was economical, time-saving, and seamless. This was a simple solution to a problem and it worked out great. I was pleased.
I hope this article helps you to find solutions too.
Here's a movie file of the finished program with both stand-ups mixed in. It's a large file. Her new stand-ups are mixed in after the second person (guy with a number 3 on his cap). GIve it time to load:
http://www.bluesky-web.com/BAPD-0807-MA.mov
Copyright 2013 by Walter Graff. This article may be circulated and shared as long as the following reference is made: 'This article appears courtesy of Walter Graff- http://www.waltergraff.com'
Please don't hesitate to send me an e-mail if you have any questions or comments please e-mail me at Walter@waltergraff.com