Setting up a professional monitor for accurate color rendition
by Walter Graff
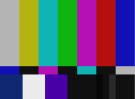
The following instructions are for setting up a monitor that can display the same type of split-field color bars as shown above. If your monitor does not have a "blue-switch" as referenced below, then you need to use a Wratten #47 blue equivalent filter which you can purchase at any photo store, or online. Kodak discontinued their Wratten 47, but numerous web sites sell equivalents. Try a search under "Wratten 47 equivalent". Here is one link as of the date of this article:
http://www.bhphotovideo.com/c/product/503593-REG/Kodak_1642701_3x3_75mm_47_Deep.html
This blue filter will work when you place it in front of your eye as a blue-separator when used in making the adjustments noted below. Where there is a reference to the 'blue-switch', substitute if for the Wratten equivalent filter.
Setting up a monitor for proper color rendition is probably the single most important thing one can do on location. Here is a simple method in maintaining a color-accurate picture in the field.
1. Allow the monitor to warm up for a few minutes.
2. Block any reflections on the screen and make sure the lighting in the location is not that bright around the monitor.
3. Switch your camera or the source you are feeding into the monitor into bars.
4. Set the 'contrast', which is also called 'picture' on some monitors to its midpoint.
5. Turn the 'chroma' also called 'color' on some monitors all the way down until the color bars are shades of black and white
Notice the three Picture Lineup Generating Equipment bars on the bottom right called PLuGE bars. The left one is set at 3.5 units, so it is effectively supposed to be invisible. The middle one is set for 7.5 units or 'standard black' in NTSC. The right-most bar is set for 11.5 units and is slightly brighter than what black represents on your monitor.
6. Adjust the 'brightness' control until the middle (7.5 units) PLuGE bar is not quite visible. The lightest bar on the right (11.5 units) should be barely visible. The right bar (3.5 units) disappears when you do this.
Since 7.5 units is as dark as video gets in the US (analog), you should not see any difference between the left bar (3.5 units) and the middle bar (7.5 units). There should be no dividing line between these two bars. In fact, both should disappear together based on the 7.5 bar, which 'just' disappears. The only division you should see is between 11.5 and 7.5
Next we want to set the 'contrast' control on the monitor for a proper white level.
7. Turn the 'contrast' all the way up. The white (100 unit) bar which is the fat brightest white bar in the lower left hand side of the screen will get real bright. Prior to turning the contrast pot down, you will notice that the 11.5 units bar is now brighter than it was when we just set it and that you can see the space where the 3.5 and the 7.5 units were.
8. Adjust the contrast down until the three PLuGE bars go back to the point where the 7.5 is barely visible and the 3.5 is not longer visible. The 11.5 is once again slightly visible.
Next we adjust the color portion of the picture. All professional monitors have a 'blue-only' switch. The instructions below are for a monitor that has it. If you do not have a blue-switch on your monitor, you need to purchase a Wratten#47 filter. This filter is blue. Place it in front of your eye and follow the instructions below substituting the references to the blue switch for the Wratten filter.
9. Press it. When you do, you are using only the blue gun in the tube to make an image. On some monitors the bars will turn shades of black and white. On others, the bars will turn deep blue.
Notice that the four bars visible are either a shade of black and white or are shades of deep blue. Also notice that each column is actually split toward the bottom of the bars making for four tall bars with four little sub bars. If the tint and color are correct, these two elements in each column should appear to be the same color or contrast. Most likely, they may need adjustment.
We are now going to make sure all the bars are the same color (as close as they can be).
Now this next step is a 'two place viewing' procedure.
10. With the 'blue switch' still depressed, turn the 'chroma' or 'color' knob until the split vertical bars on the outermost far left and the bars at the outermost far right are of equal brightness or hue if your monitor shows them as blue. You're trying to get the two vertical bars on top to match with the two small sub bars below them. All four bars (two big and two small) should appear to have the same value. Let me say it again. When you have it right, all four of the bars (the left bar with its sub and the right bar with its sub) should appear to have the same hue or contrast.
11. Now adjust the 'Hue control' or 'Phase' until the two inner bars are also equal with their sub bars and each other.
At this point as you look at the screen all the four vertical columns including the little sub bars should look equal in color intensity or brightness depending on what you monitor does when you press 'blue only'.
Unless you have a waveform and vectorscope with, your monitor is now the only way for you to see how accurate your video is. Don't adjust it!
Copyright 2013 by Walter Graff. This article may be circulated and shared as long as the following reference is made: 'This article appears courtesy of Walter Graff. http://www.waltergraff.com'
Please don't hesitate to send me an e-mail if you have any questions or comments please e-mail me at Walter@waltergraff.com
Walter Graff