
Thirty Dollars Worth of Light aka The 'Grafflight'
by Walter Graff
NOTE: Your computer monitor is not a TV set. The gamma settings of your computer monitor are usually different than a TV set, hence some of the photos may look dark or not as good as they should. Use these photos only as a reference. Also note that these fluorescent fixtures are not designed for off-speed film and electronic cinematography work and may flicker. Test one before you use it with anything but video.
I always say it's not the lights you own, but how you use them. A perfect example was a recent shoot for A&E's investigative documentary series titled American Justice with host Bill Curtis. We were just about to set-up for our final interview for the day. A time limit was involved so it was imperative for me to get everything set up as fast as possible.
My consideration for quick set-up involves using as little equipment as possible while making the most of it. I could have used any number of expensive lights in my kit, and all sorts of attachments for the set-up but I realized that if I wanted to get in and out of this place quickly, I needed to use the two fifteen dollar fluorescent lights I purchased from the local home improvement place. While some may scream blasphemy, others might realize that you don't have to use expensive lights to make good looking pictures.
My interview light kit probably has more in it than most carry on a 5 ton grip truck. Well not really but it sure has a lot of stuff in it. If you don't believe me, just ask anyone that watches me pack it up after shooting.
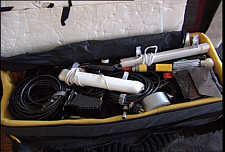
Inside my light kit with 9 stands, 10 fixtures, and everything else but the kitchen sink!
While my light kit is a story for another article, it contains a multitude of fixtures, assorted goodies and a bunch of 'stuff' that I find I need in situations where you never know what to expect. Two of those 'goodies' are my little eight-watt fluorescent fixtures that I purchased at The Home Depot which everyone is now referring to as Grafflights so I'll calll them that too for lack of a better name. They are only about 12 inches tall and quite thin. I use them as fill lights in some lighting situations and sometimes in table-top set-ups. What I like most about them is their size, and the way they produce light. They have a frosted cover over the lamp which makes for a nice soft, diverse light source. The lamps are warm white so they match well with the incandescent fixtures in my kit.
While these lights were not designed to be put on a light stand, I figured out a way to make them work. For $1.59 I purchased the kinds of clips you might attach to the wall in order to hang a rake or a broom and fastened two clips to the back of the fixtures making them great for snapping onto a stand or the side of a table or anywhere else you can clip them to.
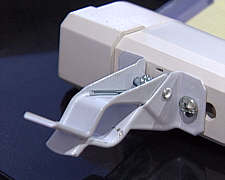
A few bucks changes the whole picture.
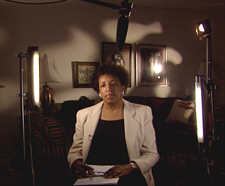
For this set-up I used both of these fixtures as my talent lights, putting one a bit closer than the other creating a brighter and weaker side to her face since we were going for that style in this show. The topic involved a well-known rape in Central Park by a group of youths some years ago so we decided on a bit more shadows on our talent than I normally use in these types of interview situations. For my background I used a Cool Lux MR16 fixture and a cucoloris that I keep in my light kit. For those of you not familiar with the term, it's a piece of foam core that I cut with some random shapes. While in a studio, I'd have high quality plywood version, these portable versions fit well in the kit. Eventually they get mangled and torn but it's easy to replace them and inexpensive too. I also used a Lowell Pro light on a dimmer for a bit of warm back light on the subject.
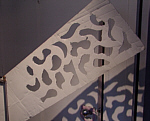
Inexpensive and effective way to create patterns.
So you might be asking yourself, what exactly did I save in using these lights as opposed to setting up a regular professional light as my key and fill? Very simply it was a tremendous savings in time. Plug in the fluorescents to one cord, clip them to a stand and your done. With regular incandescent lights I need the fixture, have to fool with barn doors, possibly diffusion, or a light bank attachment of some type, or even a reflector. That could mean lots of stands and lots of cables. This was four lights, five stands. And when all was said and done I didn't have to wait for the fixtures to cool down to put them away. We were in and out in a matter of 30 minutes total set-up and break-down time (not including interview which actually took longer).
Wide-shot of set-up (Wall pattern is out of frame to the right.)
Some might ask about flicker and green cast. Florescent's don't flicker with video as they are on the same frequency as an NTSC picture. As for green cast, I don't find that these fixtures cast enough green to notice. What I have done in the past when dealing with fluorescent fixtures that do is to spray mount a piece of 1/4 minus green inside the fixture for correction.
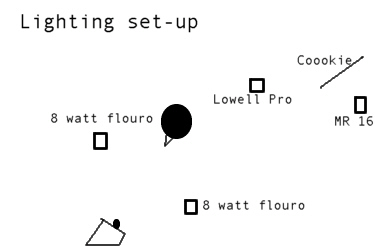
Diagram of set-up
Some folks have asked me about the fixtures causing hum in the audio. I think in years past when ballasts were less efficient and prone to leakage that might have been a problem, but with these units you can place a lav right next to them and it will not make any noise.
I've included a frame of the final shot for you to use as a reference as to how well $30 can light a person.
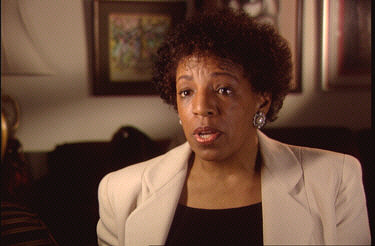
Final Frame
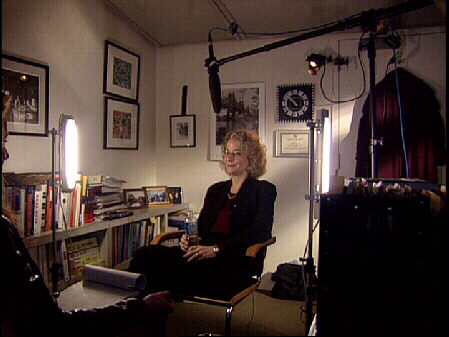
Another example of the "Grafflights" in action.
Here is another situation where my inexpensive "Grafflights" came in handy. What this photo might not show is that the space for shooting in this room is about four feet by seven feet, not enough room for big fixtures. The "Grafflights" worked great!
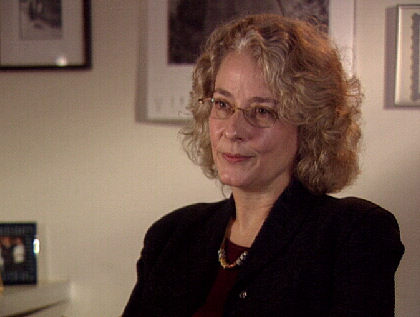
The final frame works nicely for me.
This article is copyright Walter Graff �, but may be reprinted for educational purposes as long as the following appears; Reprinted from an article by Walter Graff from www.bluesky-web.com
Send me an e-mail if you have any questions or comments at walter@waltergraff.com